

Quick Answer
Slatwall panel gaps showing at the seams are most often caused by panels that are not fully interlocked or a wall that is slightly bowed or out of level. Try loosening the mounting screws a quarter turn, pushing the panels firmly together so the tongue and groove or shiplap edge seats completely, then retightening while holding pressure on the seam.
Why This Happens
Most garage and basement walls are not perfectly flat. Even a small bow in drywall or a stud that sits a little proud can hold one panel edge out while the next panel sits flat, which leaves a visible line at the seam. This is especially common on long runs where the error compounds across several panels.
Another common cause is installation order and tightening sequence. If you fully tighten each panel before the next one is seated, the edge can be pulled slightly away from its neighbor. Over-tightened screws can also dimple or warp MDF and PVC panels, opening a gap that was not there when you first held the panels in place.
Material movement plays a role too. MDF-based slat panels and WPC composite panels can expand and contract a little with seasonal humidity and temperature changes. If panels were installed tight on a humid day or without a consistent small expansion space at the ends, they may push against each other and then show uneven gaps as they settle. You can see similar alignment issues when screws strip and the panel shifts, as covered in slatwall panel screws stripping during Install? 5 fixes before you give up.
Finally, missing trim pieces and inserts make seams more obvious. Many slatwall systems rely on vinyl inserts, J-trim, or end caps to visually close the joint and hide the screw line. Without them, even a hairline seam catches light and looks like a gap. An unfinished edge or a panel cut slightly short will also stand out more than it would with trim installed.
Fixes to Try
Work along one seam at a time and check your progress from eye level and from the side with a light shining across the panels. That side light makes small gaps much easier to see and correct.
- Loosen and reseat the seam. Back out the screws near the gap just enough to relieve pressure, then push the two panels together with even hand pressure along the full height. If the edge uses an interlocking shiplap, lift slightly and drop it in rather than forcing it straight in, then hold it closed while you retighten the screws evenly.
- Check the wall for flatness and shim behind the gap. Place a straightedge or long level across the seam. If you see a hollow behind one panel, loosen that panel and add thin cardboard or plastic shims behind the low spot at the stud line. This brings the faces flush so the seam closes without stressing the panel.
- Correct the screw pattern and depth. Make sure every panel hits at least two studs and that screws are snug but not dimpling the surface. Replace any stripped screws with the next size up or use a proper wall anchor if you missed the stud, and avoid driving screws at an angle which can pull the panel out of plane.
- Add inserts and trim to visually close the joint. Slide vinyl slatwall inserts into the grooves you are not using and add J-trim or inside corner trim at the ends. Inserts do not structurally close a wide gap, but they hide shadow lines and make a tight seam look continuous. For low ceilings where trim bulk matters, see best slatwall panels for low ceilings for lower profile options.
- Realign the whole run if gaps repeat. If multiple seams show gaps, remove the last few panels and reinstall from your most level starting point, often a corner or the most visible wall. Use a level line at the top, keep the first panel perfectly plumb, and let each following panel register off the previous interlock without forcing it. Check that accessory weight is balanced, since overloaded hooks can also pull panels apart over time as noted in best slatwall hooks for basement storage.
When to Consider Replacing It
If the gap keeps returning after you have reseated, shimmed, and retightened, the panel itself may be warped, cracked at the interlock, or swollen from moisture. MDF panels that have absorbed humidity often do not lay flat again, and a damaged tongue or shiplap edge will never pull tight. At that point, replacing the affected panel is usually faster than continuing to shim and adjust, especially if the finish is chipped or the groove is deformed.
This article contains affiliate links. If you buy through one of our links, TheGarageCrafted may earn a commission at no extra cost to you. Commissions never influence which products we recommend or how we rank them. Read our Affiliate Disclosure for details.

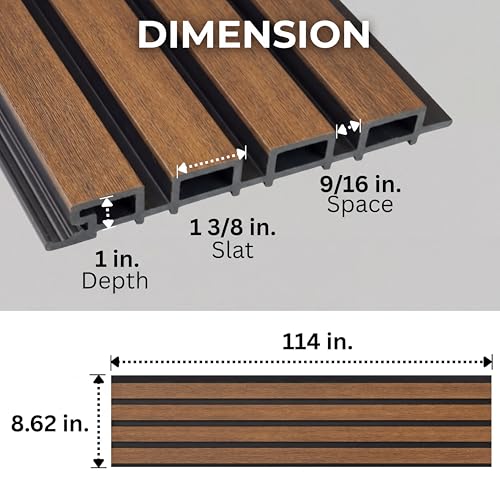
Prime WPC Exterior Slat Wall Panels 94.5in Waterproof







As an Amazon Associate we earn from qualifying purchases. Product prices and availability are accurate as of the date/time indicated.
If you would rather replace than keep troubleshooting, look for a panel with a more stable core and a secure interlocking system that is rated for your space. Waterproof WPC composite with UV resistance and a shiplap interlock can be a practical option for garages and other areas where humidity and temperature swings make gaps more likely.
When to Skip This and Call a Professional
This type of alignment fix is not ideal for walls with significant structural issues, large water stains, soft drywall, or mold, and it is not a good fit if the gap is caused by a bowed stud or foundation movement that keeps getting worse. If the wall feels spongy, you see signs of ongoing moisture, or the panels will not anchor solidly after shimming, skip this DIY adjustment and have a contractor assess the wall structure and moisture source before adding more storage weight.
Frequently Asked Questions
Why do slatwall panel gaps look bigger in winter or summer?
Temperature and humidity changes cause slight expansion and contraction in the panel core and the wall itself. You may notice seams tighten in humid months and show a hairline in dry, cold months. Keeping a consistent small expansion space at the perimeter and using inserts can make seasonal movement less visible.
Should slatwall panels be pushed together tightly or left with a small gap?
Most systems are designed for the interlock to seat fully with no visible gap at the seam, with any expansion space left at the outer edges and covered by trim. Check the instructions for your specific brand, and avoid leaving a gap in the middle of the run to compensate for an out-of-level start, as that makes every following seam look off.
Can I use caulk or wood filler to hide slatwall panel gaps showing at the seams?
It is not recommended for the functional slat grooves, since filler can crack with movement and block accessory installation. For decorative flat seams, a color-matched trim or vinyl insert is usually cleaner and reversible. If you do use caulk on a non-functional edge, choose one that stays flexible and paintable and keep it out of the slat channels.
Browse more picks in our Slatwall System category, or see our related guide on Slatwall Screws Stripping Fixes.









Write Your Review
No reviews yet. Be the first to share your experience!